7.25.2011

Heads and Hands

I had a lot of time off in Dec and Jan so I made hat and mitten sets for Megan and Anna.
Ear Cozies and Mittens
The Hat Pattern: Ear Cozies (CH-34) by Bev Galeskas
Hat Sizes: Large for Megan Raverly Project Page and Medium for Anna Raverly Project Page

The Mitten Pattern: Kathy's Mittens by Chris de Longpré
Mitten Sizes: Preschool for Megan Raverly Project Page and Toddler for Anna Raverly Project Page

The Yarn: 1 skein of Lion Brand Vanna's Choice Baby in Berrylicious and 1 skein each of Caron Simply Soft Party Black Sparkle and Purple Sparkle
Needle size: US 9

Started: 1/5/11
Finished: 1/14/11

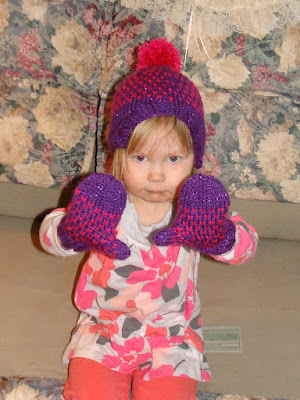
I really like the ear cozie pattern. It has two versions the pointed and rounded. I made the pointed for Anna in the past, so I used the rounded this time and added pom poms.
Anna's Ear Cozie and Mittens
I wanted the sets to be similar, but not identical. So for the body of Anna's mittens and hat I used a polka dot pattern.
Anna has the hat on backwards in this picture. When it is turned around the cozies fit over her ears better.

Anna's Ear Cozie and Mittens
Then for Megan I did stripes. Hmmm Megan has her hat on backwards too, I can see the seam O_o
The mitten pattern was relatively easy to follow. The only modification I made was lengthening the cuffs.

7.18.2011

Christmas Cardigans

The nieces and nephew recieved cardigans this past Christmas

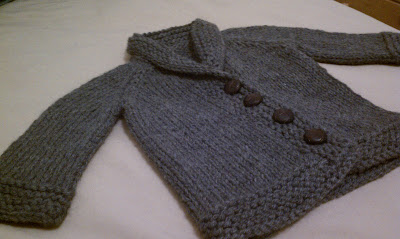
This is Wes (4mo.) in his old man sweater. I love this picture, he looks like such a little gentleman.
Wes in Baby Sophisticate
The Pattern: Baby Sophisticate by Linden Down Raverly Project Page
Size: 6-12 mo.
The Yarn: Berroco Vintage™ Chunky 1 3/4 skeins of Crackled Pepper 6107 (227.5yds/208m)
Needle size: US 8 or 9, sorry I forgot :'(

Started: 11/23/10
Finished: 11/30/10

Wes's Baby Sophisticate
This is a very easy to follow pattern and I love the shawl collar. I also really liked the yarn, it was nice and soft.

Wes's Baby Sophisticate Closeup
These plastic buttons fashioned to look like woven leather really helped complete the look.

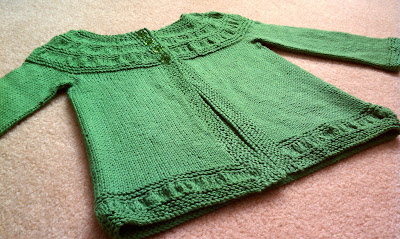
Continuing from youngest to oldest...this is Anna (2 yrs 8 mos). with my brother. She is wearing Tiny Tea Leaves
Anna in Tiny Tea Leaves
The Pattern: Tiny Tea Leaves by Melissa LaBarre Raverly Project Page
Size: 3/4 yrs
The Yarn: Knit Picks Shine Sport in Grass 4.5 skeins (495yds/452.6m)
Needle size: US 7 and 8

Started: 11/13/10
Finished: 12/20/10

Anna's Tiny Tea Leaves
I was worried about the neckline. A lot of projects on Ravelry seemed to have loose necks, which I didn't want. So for garter stitches on the yoke I used the smaller needles. It helped tightened up the neckline, so it didn't look sloppy.

Anna's Tiny Tea Leaves Closeup
The yarn was from my stash. I had started making the hexacomb cardigan with it, but didn't really like how it was turning out so I frogged it. I think it worked well for this project though.

And here is Megan (4 1/2 yrs). I started out planning to make the Lion Brand hooded raglan cardigan, but realized it required a lot of seaming. So I switched to the Duck Soup pattern eliminating the knot on the hood and replacing the garter stitch edge with a 2x2 rib.
Megan in Ribbed Duck Soup
The Pattern: Duck Soup by Anny Purls Raverly Project Page
Size: 4/5 yrs
The Yarn: Lion Bran Wool Ease Chunky in Wheat 2.25 skeins (344.3yds/314.8m)
Needle size: US 11

Started: 12/20/10
Finished: 12/23/10

Megan's Ribbed Duck Soup Closeup
I had already bought the yarn called for in the LB hooded cardi, but it is a lot heavier than what is called for in the duck soup pattern. So I followed the instructions for the 3 mo. size for the stitch counts (remember that you still need to follow the vertical height measurements for the 4/5 size).

Megan's Ribbed Duck Soup
In order to do the 2x2 edging along the button bands and hood I eliminated 9 stitches on each side. When you get to the raglan increases start the row with K1 M1 place marker M1 work 2 sts for the sleeve M1 place marker M1 following pattern instructions for the number of stitches along the back then M1 place marker M1 work 2 for the sleeve M1 place marker M1 K1.

When you're finished with the hood and body pick up stitches along the edge to create the 2x2 rib. I used a 2:3 ration. Remember to add evenly space button holes on one side of the band.

If you look at the first pic you'll notice I knit the sleeves a little too short the first time around, so I had to go back and lengthen them. Unfortunately I didn't get a new pic.

7.13.2011

Kiki Mariko

I've basically been finished with this for over a year now. I've been waiting to post it 'cause I kept thinking that I would get around to binding the edge. But I don't think that'll ever happen :)

Kiki Mariko

The Pattern: Kiki Mariko from Mason-Dixon Knitting Outside the Lines by Kay Gardiner and Ann Meador Shayne Raverly Project Page
Size: 42.5 in x 35 in (108 cm x 89 cm) before felting
        37.5 in x 29 in (96 cm x 74 cm) after felting
The Yarn: Valley Yarns Berkshire Bulky 2 balls of Chocolate and 1 ball each of Lime, Navy, Red-Purple, Burgundy, Pumpkin, Gold, and Oatmeal (108yds/99m)
Needle size: US 11 - 8.0 mm

Started: 6/6/10
Finished: 6/13/10

Kiki Mariko pre-felting

This is a colorwork project knit in the round, so you basically end up with a big tube.

Kiki Mariko pre-felting closeup

A checkerboard pattern is knit at the beginning and end of the round to form the steeked egde.

Kiki Mariko pre-felting closeup checkerboard

To felt the rug I placed it in a pillow case and put it through the hot wash cycle of my washing machine.

Kiki Mariko cutting the steek

As you cut through the middle of the checkerboard pattern your knitting will not unravel because the separate strands of yarn were fused together during the felting process.

Kiki Mariko post steeking

The steek should be cut while the rug is still wet from washing, so that you can shape the rug. It took a lot of pulling and stretching to get the rug into a even rectangle. With a little more effort I could have also straighten out the edges. But I liked the slightly wavy look, so I left them alone.

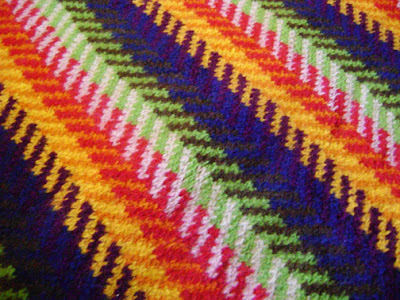
Kiki Mariko after felting closeup

The felting creates a nice tight fabric.

Kiki Mariko after felting edge closeup

This is the edge that I had meant to bind in brown using a whip stitch. I just never got around to it and after a year I don't think I ever will. And I like the checkerboard pattern just as it is anyway.